
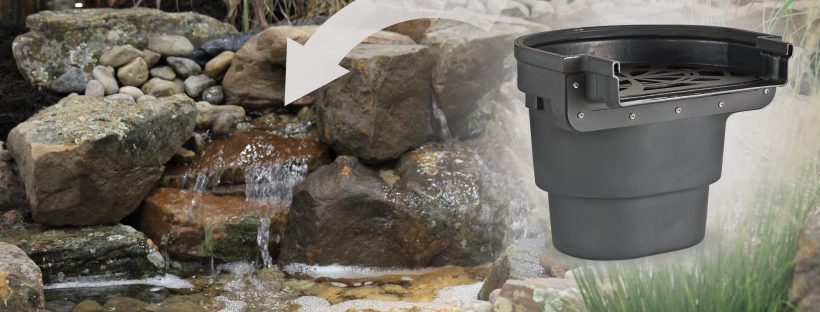
So, there’s been a lot of good, sensible talk out there about how hard it is to hide a giant plastic biofilter at the top of the stream you’re building. In all fairness, when it’s just sitting there, exposed, before rocking around it, hiding a sizeable biofilter can seem near impossible. But there are simple, solid techniques to hide those big black boxes, and some compelling arguments in favor of using biofilters to start streams.
Advantages
The advantages of having an upflow biofilter are well-known and pretty convincing. In general, they hold an impressive amount of filtration that not only removes suspended solids but provides surface area for beneficial bacteria that consume ammonia and nitrites. Their position at the top of an elevated stream usually means they can be plumbed with a drain valve, so they can be rinsed or backwashed easily. More complete cleaning may need to be done only once or twice a year, because of the way upflow biofilters work. The pump forces water up through the filter media under pressure, so the media tends not to clog easily; although the water may channel around the media, it won’t stop flowing. Finally, the ability to securely attach both the plumbing and the liner to the filter to start the initial waterfall has eliminated the most common leakage point in stream construction.

technique

Hiding a well-designed biofilter is primarily a matter of setting it into, rather than on top of, the elevated area. This is typically formed by mounding the excavated soil from the pond or reservoir. After the filter is properly set, then it’s a matter of simple rock placement. In nature, a stream cuts its way down in the surrounding land; waterfalls form as the flowing water scours out a pocket in softer soil or rock behind a hard surface. In theory, we want to bury the biofalls behind that ‘hard surface’, the rock or stone the water will flow over. What often happens instead? The biofalls is placed on the ground and soil is heaped around it up to the top of the box, then rocked, to form the utterly unnatural ‘water volcano’ we all love to hate.

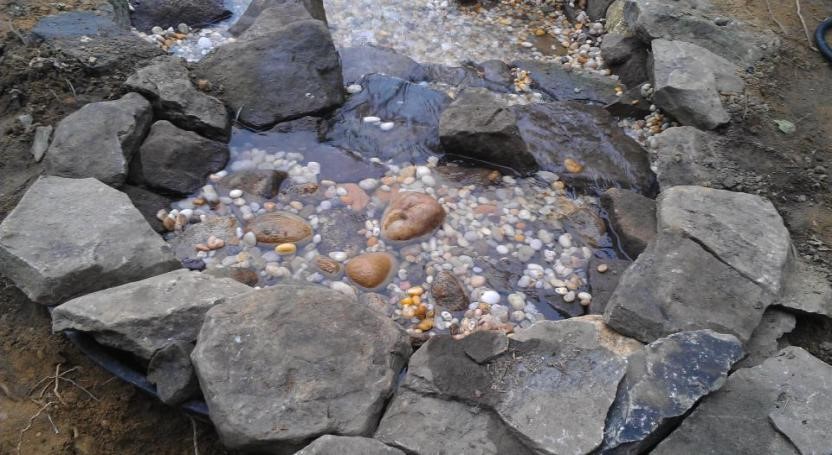
It’s a simple mistake, and just as simple to avoid. I prefer to mound and tamp the soil first, then carve out a space for the filter, then plumb to the front of the filter, but the box can be set and plumbed first – to each his own style. The point is, the soil has to end up higher than the top of the box, so the water flows out from about two-thirds up on the slope. If that requires digging the filter down, so be it. Then, I excavate the tamped soil away from the front of the filter, cutting a vertical wall the width of the filter to either side. I dig down until I reach the level of the bottom of the splash pool at the base of the falls. Then I attach the liner, leaving a couple of loose folds below the lip, to allow for settling and adjustment. Now I can start the stream by setting rock to create the first fall.
The idea is that building the waterfall is the objective, not hiding the filter. That will come by itself if I accomplish three tasks. First, I need two ‘shoulder’ rocks on either side that are taller than the filter, set to cover the ends of the spillway or opening of the filter. Next, I set a spill rock, or rocks, between the shoulder rocks up to the height of the spillway.
Now I need to fill between the rock and the filter to stabilize the falls. I usually have the space behind the shoulder rocks to push soil in behind the liner. If not, I’ll just fill any void on top of the liner with rounded stone. Either way, I’ll foam between the liner and the rocks, sealing the space so all the water goes over rather than around the spill rocks. As a finishing touch, I set small, flat rock on the ledges and grate inside the filter to finish hiding it.
Sounds simple, and it is. Working ‘backwards’ on the falls instead of focusing on hiding the filter actually hides it better. Couple of quick recommendations:

- Get the largest filter you can fit. The larger the filter is, the easier to hide, because the stones set on the grate or ledge can be larger without compromising the flow or forcing water up over the sides. Of course, having more media and settling volume can only help as the pond matures and organic loads increase.
- Tilt the filter forwards a couple of degrees, on a well-tamped base. Nothing worse than having a filter settle and water leak out over one side or the back.
- I always plumb the filter with a cleaning drain, and use Matala semi-rigid mats, to allow for fast periodic backwashing. This reduces the frequency of tearing the filter apart for major cleanings to once every couple of years.
If you have any questions or tricks to concealing a biofilter please comment below.

My bio filter has a lid . It says I have to have positioned straight but it’s not very nice to look at, how do I hide it? . Thanks
Hi Mandy! You are not alone in feeling that the lid that came with your biofilter is not very nice to look at. Lids are usually quite utilitarian, unlike the rest of the pond! Fortunately we have a very attractive alternative that goes right over the biofilter, lid and all. Atlantic’s Rock Lids are strong, lightweight and available in four different color ranges to match natural stone from all over the country. Three sizes typically accommodate just about any eyesore. I use them all the time, especially to hide skimmers at the very edge of the pond, and they look great.
You can find our rock lids here on our website! https://www.atlanticwatergardens.com/products/categories/water-garden/rock-lids
The bio filter I have can I still bury it in the ground and then put the lid over it ?
Thank you for this article! This was super, super helpful and is having me rethink my bio filter placement! I got the 12″ spillway, 1,000+ gal/hour and was originally planning to put it on top but now I am going to totally redesign tomorrow and aim for putting it in the ground. Amazing idea and glad I found you! Bookmarking this page for help! BTW, the photos are mega helpful for DIY’er’s like myself.
Great tips Demi!! Always learning something new!
Those are some amazing pictures of hidden FilterFalls boxes!